Utiliser IPFS pour la réplication des données
cestoliv, il y a 2 ans - ven. 15 juil. 2022
Dans cet article
1. Qu'est-ce qu'IPFS ?
IPFS signifie InterPlanetary File System. Comme le dit sa documentation :
Décentralisé
En effet, c'est un système qui permet de stocker des fichiers en peer-to-peer, comme les torrents. Au lieu de demander un fichier à un serveur central, vous le demandez à tous les pairs qui le possèdent également. Il n'y a pas de serveur central, donc le contenu est toujours accessible (tant qu'au moins un pair le possède).
Adressage par contenu
Dans la plupart des cas, le contenu est adressé par un chemin : les fichiers sur votre ordinateur /home/cestoliv/Documents/fichier.txt ou sur le web cestoliv.com/fichier.txt.
Avec IPFS, le contenu n'est pas adressé par son chemin, mais par son contenu. Ainsi, l'adresse d'un fichier sur IPFS est le hachage de son contenu, par exemple : /ipfs/QmXoypizjW3WknFiJnKowHCnL72vedxjQkDDP1lXWo6uco
2. Créer un réseau privé IPFS avec IPFS Cluster
Réseaux privés IPFS
Si IPFS permet, comme les torrents, à tout le monde d'accéder au contenu, il est aussi possible de créer un réseau privé, où seuls les pairs que vous autorisez peuvent accéder à certains contenus. C'est ce que nous allons faire.
IPFS Cluster
En outre, nous voulons répliquer les données, c'est-à-dire que plusieurs pairs doivent les télécharger. Lorsque nous accédons à un fichier sur IPFS, il reste disponible plusieurs jours sur notre machine avant d'être supprimé pour libérer de l'espace. Or, dans notre contexte de réplication, nous voulons que tous nos pairs téléchargent et conservent tous nos fichiers.
IPFS répond à ce problème grâce au concept de PIN. Si vous "pointez" un fichier, il sera téléchargé et jamais supprimé.
Nous allons donc utiliser IPFS-Cluster, un outil qui permet de contrôler tous les pairs pour leur dire de pointez un fichier. Ainsi, il suffira de pointez un fichier dans notre cluster, et tous les pairs le feront automatiquement.
3. Créer le nœud principal
Allez sur votre nœud principal (celui qui recevra les données à dupliquer en premier) et créez un dossier de travail.
mkdir -p ipfs-cluster && cd ipfs-cluster
Ensuite, créez un fichier docker-compose.yml avec le contenu suivant :
Avant de lancer les conteneurs, nous devons générer la clé swarm pour créer un réseau privé IPFS et un CLUSTER_SECRET pour authentifier les autres nœuds de notre réseau privé.
Générer la clé swarm
mkdir -p ./data/ipfs/data
echo -e "/key/swarm/psk/1.0.0/\n/base16/\n`tr -dc 'a-f0-9' < /dev/urandom | head -c64`" > ./data/ipfs/data/swarm.key
Créer le CLUSTER_SECRET
echo -e "CLUSTER_SECRET=`od -vN 32 -An -tx1 /dev/urandom | tr -d ' \n'`" >> .env
Enfin ! Vous pouvez démarrer les conteneurs !
docker compose up -d
Vérifiez que tout s'est bien passé dans les journaux : docker compose logs
(Vous pouvez voir des erreurs fausses car le cluster démarre plus rapidement que le nœud IPFS, donc le cluster ne pourra pas se connecter au nœud au début)
Comme il s'agit d'un réseau privé, nous allons supprimer toutes les connexions avec les nœuds publics :
docker compose exec ipfs ipfs bootstrap rm --all
(Optionnel) Installer ipfs-cluster-ctl sur l'hôte
ipfs-cluster-ctl est l'outil qui nous permet d'interagir avec notre cluster (notamment pour indiquer quels fichiers doivent être épinglés). Cela se fait via le port 9094 que nous avons ouvert sur le conteneur.
wget https://dist.ipfs.io/ipfs-cluster-ctl/v1.0.2/ipfs-cluster-ctl_v1.0.2_linux-amd64.tar.gz
tar -xvf ipfs-cluster-ctl_v1.0.2_linux-amd64.tar.gz
sudo cp ipfs-cluster-ctl/ipfs-cluster-ctl /usr/local/bin
# Vérifier que ipfs-cluster-ctl a bien été installé
ipfs-cluster-ctl --version
Il n'est pas obligatoire d'installer cet outil sur l'hôte, car il est déjà installé dans le conteneur. Si vous ne souhaitez pas l'installer, remplacez simplement la commande ipfs-cluster-ctl par docker compose exec cluster ipfs-cluster-ctl.
Tester que le nœud principal fonctionne
Pour tester que notre réseau est privé, nous allons ajouter un fichier au cluster et vérifier que nous ne pouvons pas l'ouvrir depuis un nœud public.
Pour cela, nous devons ajouter un fichier unique. Si nous ajoutons simplement un fichier contenant "Hello world!" et que quelqu'un l'a déjà ajouté sur un nœud public, le hachage sera le même, donc notre fichier sera indirectement accessible via les nœuds publics.
echo "Hello $USER (`od -vN 6 -An -tx1 /dev/urandom | tr -d ' \n'`)!" > hello.txt
ipfs-cluster-ctl add hello.txt
# output: added <votre hachage de fichier> hello.txt
Testons maintenant que notre réseau IPFS est privé. Essayez d'afficher le contenu du fichier depuis le conteneur (cela devrait fonctionner) :
docker compose exec ipfs ipfs cat <votre hachage de fichier>
# output: Hello <vous> (<un numéro aléatoire>)!
Mais si vous essayez d'afficher le contenu du fichier depuis un nœud qui ne fait pas partie de votre réseau privé, cela ne devrait pas fonctionner :
# Essayez d'ouvrir `https://ipfs.io/ipfs/<votre hachage de fichier>` dans votre navigateur.
4. Ajout de nœud(s) de réplication
Cette partie doit être répétée pour chaque nœud de réplication que vous souhaitez ajouter.
Allez sur votre nœud de réplication et créez un dossier de travail.
mkdir -p ipfs-cluster && cd ipfs-cluster
Créez un fichier docker-compose.yml avec le contenu suivant :
Avant de lancer les conteneurs, nous devons créer le fichier .env et y mettre le même CLUSTER_SECRET que dans .env du nœud principal.
CLUSTER_SECRET=<votre cluster secret>
MAIN_NODE=/ip4/<ip-du-nœud-principal>/tcp/9096/ipfs/<id-du-nœud-principal>
# ex. MAIN_NODE=/ip4/192.168.1.1/tcp/9096/ipfs/13D3KooWFN75ytQMC94a6gVLDQ999zxADpFpi7qAir9ajGrNHn8d
L'ID du nœud principal peut être trouvé en exécutant la commande suivante sur le nœud principal :
cat ./data/cluster/identity.json
Nous devons également copier la swarm.key générée sur le nœud principal vers notre nœud de réplication (./data/ipfs/data/swarm.key sur le nœud principal)
# Sur le nœud principal
# Copier le résultat de :
cat ./data/ipfs/data/swarm.key
# Sur le nœud de réplication
# Coller la swarm key
mkdir -p ./data/ipfs/data
echo "/key/swarm/psk/1.0.0/
/base16/
<votre swarm key>" > ./data/ipfs/data/swarm.key
Vous pouvez maintenant démarrer les conteneurs !
docker compose up -d
Vérifiez que tout s'est bien passé dans les journaux : docker compose logs (Vous pouvez voir des erreurs fausses car le cluster démarre plus rapidement que le nœud IPFS, donc le cluster ne pourra pas se connecter au nœud au début)
Comme il s'agit d'un réseau privé, nous allons supprimer toutes les connexions avec les nœuds publics :
docker compose exec ipfs ipfs bootstrap rm --all
Se connecter au nœud principal
Nous devons maintenant ajouter nos nœuds en tant que pairs pour qu'ils puissent communiquer. Le nœud principal doit connaître les nœuds de réplication, et les nœuds de réplication doivent connaître le nœud principal.
Sur le nœud principal :
docker compose exec ipfs ipfs bootstrap add /ip4/<ip_du_noeud_de_réplication>/tcp/4001/p2p/<id_du_noeud_de_réplication>
# Exemple: /ip4/192.168.1.2/tcp/4001/p2p/12D3KopWK6rfR6SKpmxDwKCjtnJWoK1VRYc7BDMZfJxnopljv68u
L'ID du nœud de réplication peut être trouvé en exécutant la commande suivante sur le nœud de réplication :
docker compose exec ipfs ipfs config show | grep "PeerID"
Sur le nœud de réplication :
docker compose exec ipfs ipfs bootstrap add /ip4/<ip_du_nœud_principal>/tcp/4001/p2p/<id_du_nœud_principal>
# Exemple: /ip4/192.168.1.1/tcp/4001/p2p/92D3KopWK6rfR6SKpmxDwKCjtnJWoK1VRYc7BDMZfJxnopljv69l
L'ID du nœud principal peut être trouvé en exécutant la commande suivante sur le nœud principal :
docker compose exec ipfs ipfs config show | grep "PeerID"
Tester notre installation
echo "Hello $USER (`od -vN 6 -An -tx1 /dev/urandom | tr -d ' \n'`)!" > hello.txt
ipfs-cluster-ctl add hello.txt
# sortie : added <votre hash de fichier> hello.txt
Vous pouvez maintenant observer la réplication en action avec la commande ipfs-cluster-ctl status <votre hash de fichier>.
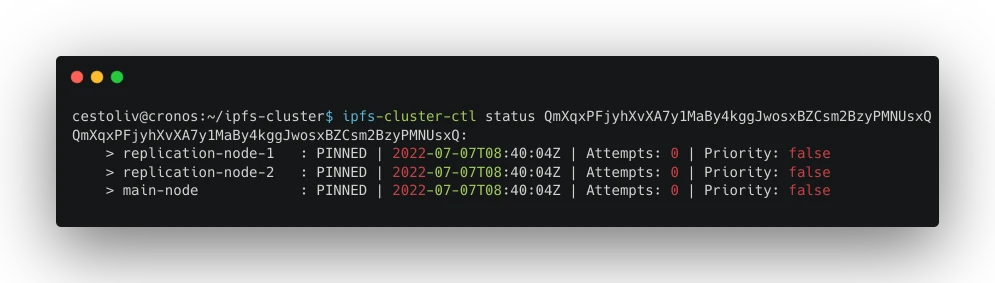
La mention PINNED signifie que le pair a épinglé le fichier, donc il l'a téléchargé et le conservera.
5. Aller plus loin
Nous allons maintenant voir un cas d'utilisation plus spécifique de notre cluster : répliquer un dossier sur tous nos nœuds.
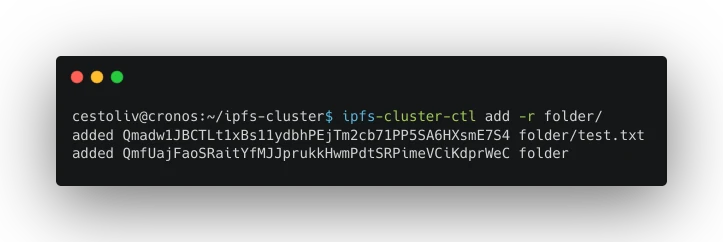
En ajoutant l'option -r, vous pouvez synchroniser un dossier et tout son contenu.
ipfs-cluster-ctl add -r folder/
Comme vous pouvez le constater, IPFS stocke à la fois le hash du dossier lui-même et le hash de chaque fichier.
Mais que se passe-t-il si le contenu du dossier change ? Comment répliquer ces modifications ?
Pour répliquer les modifications d'un dossier mis à jour, il faut l'ajouter à nouveau. À ce moment-là, le hash du dossier changera, et le hash des fichiers modifiés aussi. Si un fichier n'a pas changé, son hash restera identique.
Voici la procédure à suivre :
- Désépingler la version actuelle
- Épingler la nouvelle version
- Supprimer les fichiers qui n'existent plus ou leurs anciennes versions
Voici la version en script Bash :
#!/bin/bash

# Désépingler tous les fichiers
if [[ -n $(ipfs-cluster-ctl pin ls) ]]; then
    ipfs-cluster-ctl pin ls | cut -d' ' -f1 | xargs -n1 ipfs-cluster-ctl pin rm
fi

# Épingler la nouvelle version du dossier
ipfs-cluster-ctl add -r folder/

# Exécuter le garbage collector pour supprimer les fichiers qui ne sont plus épinglés
# (supprime les fichiers ou leurs anciennes versions)
ipfs-cluster-ctl ipfs gc
Merci d'avoir lu !